
Improving This And You’ll Improve Your Swing Path
By CHRIS JOHNSTON, PGA PROFESSIONAL | FL Golf Schools Central Florida Director
PHOTOS BY DALE SHANKLAND

For this lesson you need a five-pound weight, your driver and hand weights.
I can’t emphasize enough how important a good golf posture is to the success of your golf swing. Grip, posture, stance and ball position are the cornerstone ingredients that determine how your swing will work, how it looks and where your shots will go. The effect of having poor posture can be damaging in so many ways. It can cause you to straighten up in your golf swing, referred to as loss of posture, it can also restrict body rotation, leading to an overly dominant arm swing, all of which can result in missing the ball, toe shots and hitting fat shots with club contact behind the ball. In addition, poor posture can have a major effect on the PATH OF YOUR SWING.
A CLOSER LOOK
There are three areas as it relates to posture: spine angle, arms and knee flex. For the purpose of this article, we will take a closer look at spine angle and arms. Only a slight knee flex is required and should easily be attainable.

GOOD GOLF POSTURE
Good Posture has the same spine angle you had while standing up straight, but hinged from the hips with a pelvic tilt. The pelvic spine tilt allows your arms to hang straight down naturally under your shoulders, Photo 1.
POOR GOLF POSTURE
Poor Posture has very little pelvic tilt from the hips. Instead, the hinging is occurring throughout the spine, creating a curve to the back. When this happens, the tendency is to reach forward with the arms,Photo 2.
POOR GOLF POSTURE = POOR PATH
Plane and Path
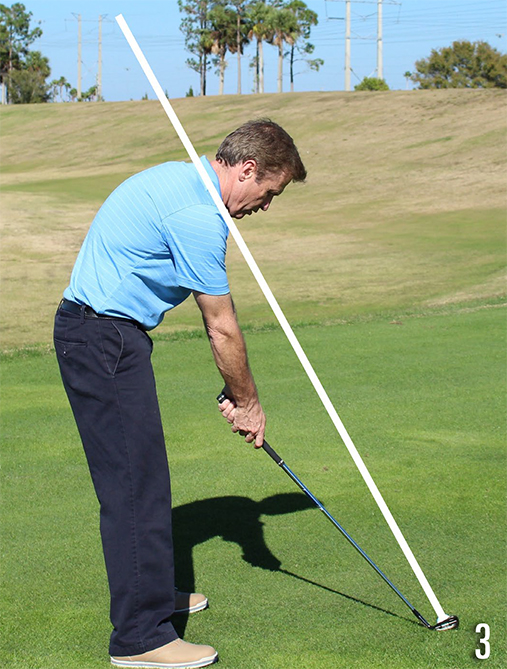
In order to see the effect that poor posture has on path, I have drawn a line from the golf ball through the top of my shoulders, Photo 3. NOTE: With good path, the shoulder plane line should never be broken with the club going outside this line at any time during the backswing, downswing or follow-through.
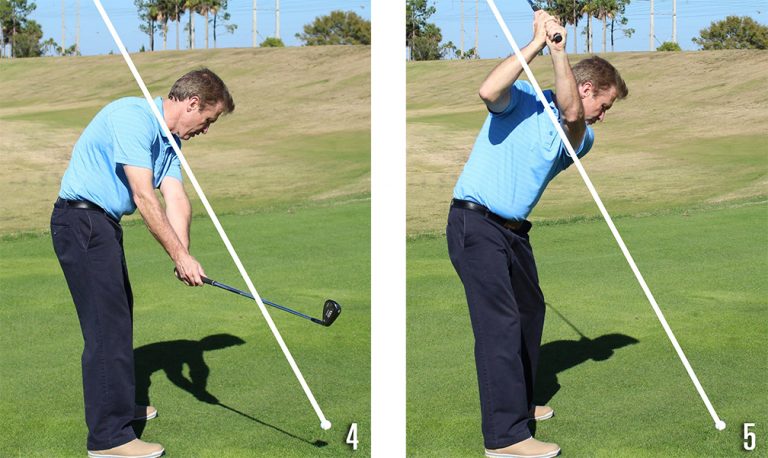
Backswing = Above the Plane
With the spine curved, hip and shoulder rotation is restricted. Now, the swing starts with arms in an abrupt upward fashion, Photo 4, causing the club to go above the plane in the backswing, Photo 5. At address, when the arms are reaching, they are tight. Tension in the arms will also promote the same, abrupt upward motion. The feeling is similar to picking up an axe to chop wood.

Over Top = Cut Across
Since the start of the backswing was predominantly generated with the arms due to restricted body rotation, the start of the downswing will be same, causing the club to stay over the top of the plane, Photo 6, with the club cutting across the plane line. Photo 7, This is similar to an out to in cut spin with a tennis shot.
THE RESULT: Shots are hit off line with pulls, pull hooks and pulls slices, along with no velocity on the shot.
GOOD POSTURE = GOOD PATH

Plane and Path
In order to see the effect that good posture has on path, I have drawn the same shoulder plane line, Photo 8. This line will make it easy to see the effect good posture has on path in the golf swing.
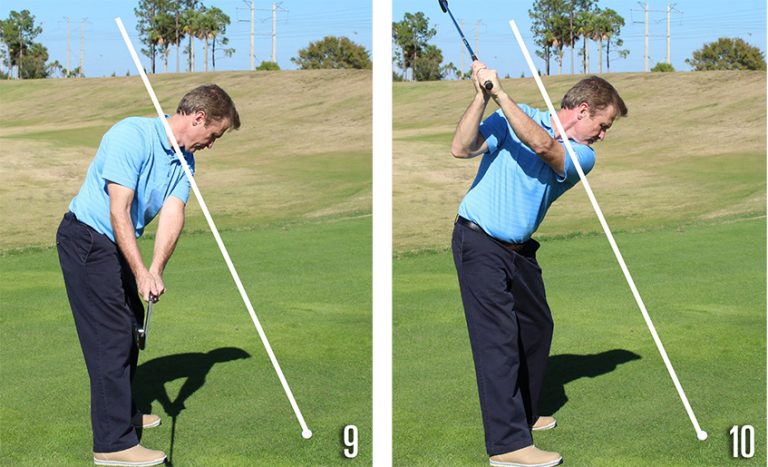
Backswing = Under the Plane
Without the curve in the spine, hip and shoulder rotation is freed up. Now, the swing starts with arms and body rotation, with the club to going under the plane in the backswing, Photos 9 and 10. Also, when the arms are hanging at address they are free of tension. Tension-free arms will follow the path body rotation has created. The feeling is now rotary, like swinging around your body.
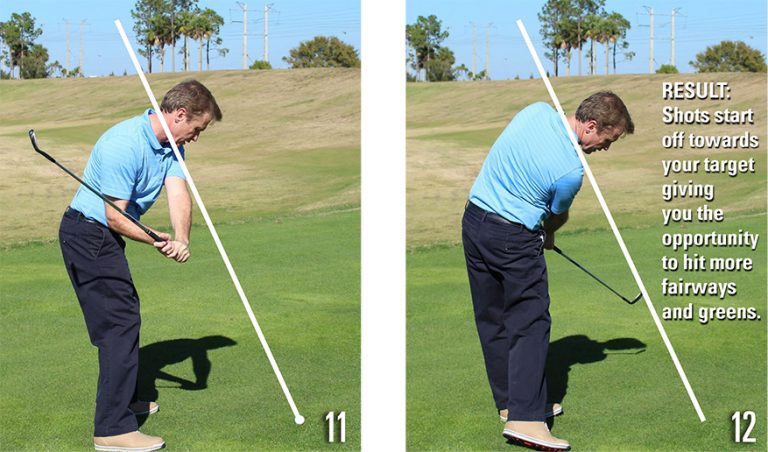
Down Under = Down The Line
Since the start of the backswing is rotary with tension free arms, the start of the downswing will begin with body rotation in an unwinding fashion with the drop of the arms, down and under the shoulder plane, Photo 11, with the feeling of swinging down the line in the follow-through, Photo 12.
THE RESULT: Shots start off towards your target giving you the opportunity to hit more fairways and greens.
DRIVING NATURAL GOLF POSTURE with a little GRAVITY
![]()
In order to work on good posture, you’ll need a driver and a five-pound dumbbell weight, Photo 13. First, while standing straight up and in your golf stance, take the grip end of the driver and slip it between your belt and pants, Photo 14. If you do not have pants with a belt, simply put on a belt and slip the club between the belt and what you are wearing. An example are women’s shorts/skirts and gym pants if you are working on this at home.
Next, move the driver down until the club head touches your head, Photo 15. At this point, you should still be in a standing position and in your natural spine angle you would have as if you were holding a drink and talking to somebody in front of you, Photo 16. This “drinking position” is important for establishing your natural spine angle.
Now, pick up the 5 pound weight (Photo 17) hold the weight in both hands, in your drinking position (Photo 18). Finish by hinging from your hips, while letting your arms drop down with gravity from the five-pound weight (Photo 19). When you do this, move your feet to establish balance, while you keep the club contact point on your head.
GOLF POSTURE TRAINING
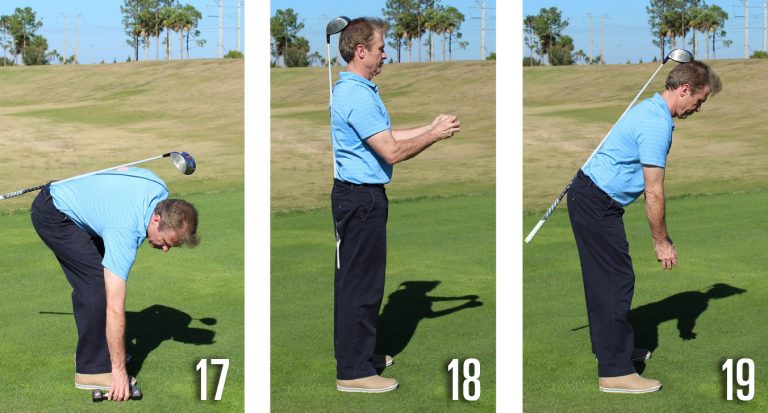
Photos 18 and 19 are your Posture Training photos. Once you have completed your posture, stay in this position for a couple seconds and then move back to the drinking position (Photo 18) and Repeat.
In order to get sufficient feel, repeat the process 5 to 10 times.
CLUB, WEIGHT and ROUTINE
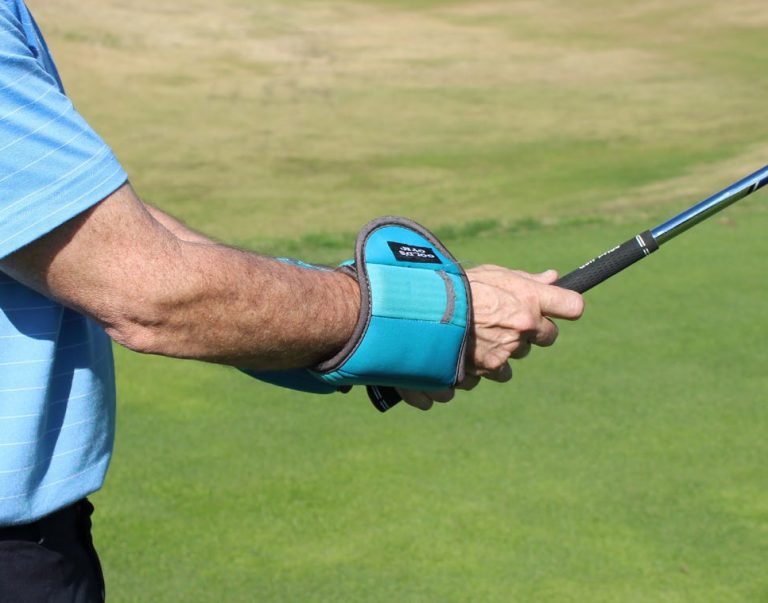
Training with the driver and five-pound weight is important for acquiring the body feel of a good posture, but you’ll need to transfer this feel to the golf club with your routine, to achieve complete feel of good posture while you set up to the ball. In order to do this, you will need a pair of either 1-1/2 pound or 2-1/2 pound ankle weights.
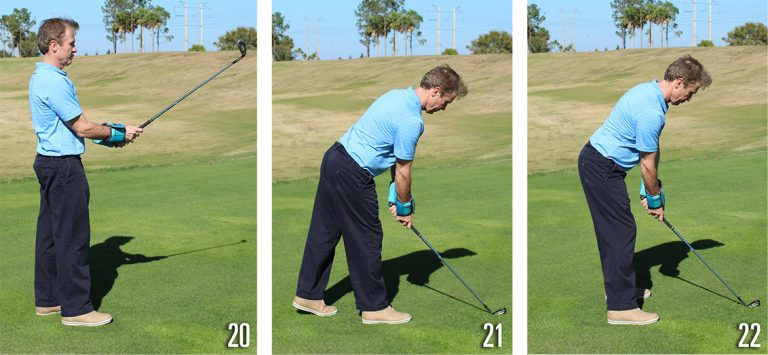
First, put the ankle weights on both wrists. Then, take your club and begin in your standing, drinking position with the clubhead approximately eye level (Photo 20). Next, step and bow to the ball with focus on hinging from your hips (Photo 21), while allowing the ankle weights to assist with the natural dropping of the arms. Finish by completing your stance (Photo 22). Practice this without the club on your spine and then eventually without the ankle weights after you have achieved the feel of good posture.